Pages

Monday, January 9, 2012

A "Green" Tea Party

Zoe and I just had a tea party.  :o)  We drank from fancy glasses and ate freshly baked chocolate chip cookies.  She is my little sidekick.  Zoe doesn't really care what we do or where we go, as long as she gets to be with her Mommy and help out.  She is such a sweet, loving, smart, silly little thing.  She constantly makes up songs, especially when someone around her is feeling down.  She sang to Luke the other day when he was feeling scared.  Sweet girl!
So back to our "tea" party.  We didn't actually have tea.  We had some super yummy and amazingly healthy juice that I made with  my new juicer! 
I was a SUPER picky eater as a kid.  I'm still kinda picky now, but I've definitely gotten a LOT better.  I literally went years without eating a single green food, and really didn't eat fruit too often. 
I'd say Zoe is my least picky eater.  She's the most willing to try something new, even if it looks different.  I've  found that I actually have to make sure I juice enough for both of us, as she always wants some of whatever I've made.  Her favorite is apple pear.  One large Honeycrisp apple and two pears.  Delish!
For our "tea," we had a lovely concoction of apple, lemon, and baby spinach.  You totally just read that right.  Spinach.  Juice.  Indeed. 
 I know, I know.  I'm weird.  Who drinks spinach?  THIS GIRL!  I do like to eat spinach in salads, but I've found that you can cram a lot more in when you're juicing than if you tried to sit down with a fork and eat it.  We used half of a brand new container of spinach in our juice, 1 whole lemon, and two and a half apples.  There's no way I could sit down and chew all of that, so I drink it instead.  A super boost of nutrition in 5 minutes! 
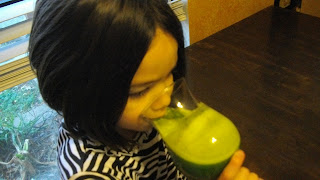


The lighting is all funky in here, so the picture doesn't really show how bright green this stuff is.  Did we eat cookies with our healthy juice?  Yah.  Do I feel bad about that?  Nope.  Know why?  Because my kid just guzzled a glass of what works out to be almost 2 servings of fruit and 2 servings of veggies.  How many veggies has your kid had today?  :oP 

By the way, don't forget to enter the Rosettes are Red giveaway!!  A winner will be chosen next Sunday night!


Sunday, January 8, 2012

Give it away, give it away, give it away, now!

Sorry...I was having a Red Hot Chili Peppers moment with the title of this post...hooray for 90s music!  Happy Sunday to all!  Yeah, I know, Sunday's almost over.  Mike had drill this weekend, so I've been flying solo and the monkeys have me way outnumbered.  At least I got this posted before Monday, right?  Right?  Right.
So...I have a brand spankin' new item for 2012 that I recently posted on my facebook page.  A sweet little pom pom necklace for all the mamas, 'cause we need a little somethin'-somethin', too.  In honor of the upcoming mushy love holiday, and in keeping with the theme of the most recent tutorial, I am doing my first ever giveaway on this blog!  Sa-weet!
I give you:  Rosettes are Red!
 Isn't she pretty?  I'll have these available for purchase as well for the next month, but I love you all so much, I just really want to give one away!  YAY!  Here's what you need to do:
1st entry:  Become a follower of the blog and leave a comment letting me know you did so.
2nd entry: Become a fan on facebook and leave a separate comment HERE to let me know.
BONUS entry:  Browse the albums on my facebook page and leave a comment HERE telling me you favorite item.  
I'll use the random number generator to choose a winner next Sunday night!  GOOD LUCK!


Friday, January 6, 2012

Rosettes are Red, Violets are....not in this post. :o)

Hello, Lovelies!  I hope your week was fabulous!   I want to share a project I made the other day for Valentine's Day.  It can really be used whenever, if you use red in your decor.
I never really decorated a whole lot for the holidays or seasons.  I have always wanted to, and admired those who did, but never could seem to find the time to do all the projects I have rattling around in my head.  I have a hard time managing my time, and SO many things going on (I'll lay it all out for you sometime...it's NUTS) that I usually end up doing absolutely nothing when I am able to grab some down time. 
As a result, I have spaces in my house (like my own bedroom and bathroom) that have never really been decorated at all.  The walls are still the same off-white they were when we moved in 8 years ago.  BORING!  We did do a remodel in the kitchen, which I love, and the kids' rooms and bathroom are painted.  There have been a couple of times when we thought we might sell, and even had the house on the market for about three months.  Circumstances changed, so we stayed.  We have decided that we will stay in this house for at least another year, maybe two.  So......I have decided to love every space in my home.  Why not?  
So here's to making it lovely!
Rosettes are Red Topiary
This is a great project for any occasion, and requires very little in the way of supplies.  All you need to get started is a pair of sharp scissors, a ruler, disappearing ink fabric marker, and a couple of sheets of felt.  I'm using red, since a certain mushy love holiday is approaching. :o)
 You will also need a four inch styrofoam ball, available anywhere you can find craft supplies.  I think mine came from Walmart, and a hot glue gun.
Mark your felt every 1/2" vertically, then cut along the lines to make nice, even strips, like this:
Do this to both of your felt sheets.  Next, get that glue gun going, and let's make some rosettes!  Take a strip and pinch the end:


 You will then twist the strip as you wrap it around itself, using a dot of hot glue every so often to keep things together.
Yes, I know I need to stop biting my nails.  I went YEARS without biting them, and recently started again...attractive, isn't it?  Anywhooooo...keep twisting and gluing until you have a cute little rosette, like this:
CUTE!  Do this to all your strips, and pretty soon you will have a nice little pile of rosettes!   You can put them in a pretty little bowl and leave it at that, if you like:
But I don't wanna do that, so I'm gonna grab the aforementioned styrofoam ball and glue it up, baby!  Snuggle those puppies up to each other so the white doesn't show through:
There's not really a pattern to it, just fill in all the space until your ball is completely covered.  
Now it just needs a home!  I used a chunky candlestick for mine.


Ta-DA!  Great for part of a centerpiece, on a mantle, windowsill, wherever!  If you make one for yourself, send me a pic so I can applaud your craftiness!  Email pictures to FiddleNBowBiz@gmail.com
Happy Crafting!
P.S. Stay tuned....a giveaway will be posted tomorrow!  WOOT! 

Tuesday, January 3, 2012

Nom Nom Nom

Here are the recipes I promised!  Enjoy!
Sour Cream Chicken Enchiladas
Ingredients:
13 oz cooked, shredded chicken (I used canned because I didn't have any fresh. Fresh would be better!)
16 oz tub sour cream (I used light)
Shredded cheese (enough for a bit in each enchilada, plus enough to sprinkle generously over the whole pan)
small can diced green chilis
can cream of chicken soup
tortillas of choice (I used the smaller, flour kind)

Preheat oven to 350.   
Take shredded chicken and put in a bowl.  Add some shredded cheese and sour cream until you have the consistency you like.  I used maybe four ounces of sour cream...I think...I don't know..just throw some in there till it looks right. :o)
Grease a 9 x 13 baking dish.  Spoon chicken mixture into tortillas, roll up, and line them up in the dish.  I did one row all the way across, then stuck some in sideways in the space left over.  You can pack them in tight if you want, but the sauce will cover each one better if you leave a little space in between. :o)
In a small saucepan, heat cream of chicken soup until warm, add 8 oz sour cream and can of chilis.  Stir until blended.  Pour over enchiladas and spread evenly.  
Sprinkle a whole mess of cheese over the whole thing.  Really pile it on there. 
Bake until cheese is bubbly and enchiladas are heated through.  
SuPeR yummy!  I got this recipe from a friend, and it's so simple, yet SO good!  I didn't take any pictures, so here's one I borrowed from the web:

We served this will a green salad, some Wholly Guacamole and chips.  Delish!  It was a big hit with everyone.  Even the kids tried a bite or two. :o)  This is a great dish for gatherings or to take to a friend.  We Baptists like to feed people. 
You know what else we like?  DESSERT.  Oh, my friends.  I am about to introduce you to a pan full of sweet goodness!  


Sopapilla Cheesecake
Ingredients:
2 cans of crescent rolls (I used reduced fat)
2 8 oz bricks of cream cheese, softened (I used neufchatel)
1 tsp vanilla
1/2 c sugar

Preheat oven to 350. 
Grease (or butter!) a 9 x 13 dish.  You can use a smaller dish if you like, your cheesecake will just be taller. ;o)
Spread one can of crescents in the dish to make the bottom crust, pinching seams to seal.  Whip cream cheese, sugar, and vanilla until well blended.  Spread over crust.  Use other can of crescents to make the top crust, pinching seams to seal.  Then you need the following:
1/3 c sugar
1 tsp cinnamon
1/4 c butter, melted
Drizzle melted butter over the whole thing and sprinkle the cinnamon and sugar on top and bake for 20-25 minutes.  
AHHHH!  It's soooooooo good.  Too good.  Insanely good.  
Make some.  You won't be sorry.
 
yum

New Year and Christmas Re-Cap

Happy New Year, everyone!  Our Christmas break is over as of today.  Sigh.  Now all the hectic schedules and rushing around starts up again.  It's been really great to not have a rigid schedule these last couple of weeks.  I am kind of ready for the boys to go back to school, though. ;P
Our Christmas was stretched over about four days.  We spent Christmas Eve with the Rice side.  Mike's mom was in town, and we gathered at Greg and April's (his brother and sister-in-law) house for ice cream sundaes and presents.  Seth read the bible, and we talked and laughed until WAY too late.

Christmas day didn't go as originally planned.  We were invited to friend's house about 2 hours away to have Christmas dinner and spend the night.  When these friends lived here in town, they had no family close, and we spend part of almost every holiday with them.  Unfortunately, some illness popped up and we ended up not going.  In order to keep from hurting feelings on either side of our family, we quietly stayed home and just had a day with the five of us. 
We decided to scale back on the presents this year and do a few presents for each kid, and one big family gift.  We decided to get a Wii (yes, I know we're late in the game) and have had a blast playing it together!  Even Zoe has gotten in on the action, and is pretty good at bowling and golf.
The day after Christmas, we went to Ft. Worth to see my brother and his family.  My nephew, Justin, turned 9 that day, so we got to have Christmas and a birthday party all at once!  My sister-in-law, Megan, made cake pops to look like red Angry Birds and some to look like Lego man heads.  Cute!  Our kids always play great together and there was much laughter and nerf gun shooting.
We got together with my parents on Wednesday and had a YUMMY dinner of sour cream chicken enchiladas and salad, followed by sopapilla cheescake.  Oh, MY!  I will post recipes for both in another post.  We all got some fabulous presents, including a juicer for me, (I made apple pear juice the next morning!)
a Kindle for Seth,
and Zoe's favorite gift of the season, her American Girl doll.
Her face when she realized what she had gotten was priceless.  She promptly named her new friend, "Little Zoe," and has carried her EVERYWHERE.  She woke up four times that night to come tell me about her.  :o)
 Luke's favorite gift was his remote control truck Mike's mom got him.  I haven't been able to snap a picture of that yet, so here he is with his Angry Birds shirt!


As the new year rolls in, I can't help but think of things I'd like to accomplish in the next year.  Here's my list so far:
1. Run a 5K (or two) and possibly the White Rock Half Marathon.
2. Grow my little business so that it can replace the work I do outside of the home.
3. By more from the fresh food sections of the grocery store than from the pre-packaged sections.
4. Read my bible EVERY day.
5. Go on a date with Mike no less than once a month, preferrably twice.
6. Spend time alone with each of my kids once a week.
Share your new year's resolutions/goals!  I'd love to hear them!

Saturday, December 24, 2011

Merry Christmas Eve, Ya'll!

Merry Christmas Eve, everyone!  We started the day off with some YUMMY buttermilk pancakes, made from scratch, thankyouverymuch.  Seriously, they were delish.  I got the recipe from the packaging of these:
They are so cool!  I didn't use the molds today, we just did normal pancakes.  Super yummy!  My crew loves pancakes and each kid will eat their weight in them if I don't stop them!  I made enough for tomorrow morning, too!  Since we have church services tomorrow, this will save a lot of time in the morning.
I still need to finish a couple of handmade gifts.  I know, I know....but procrastination is a fine art, and I am an artist.  :o)  Two of those gifts are to be given tonight (yikes!) when we open presents with Mr. Fiddle's family.  I should probably jump on those, ya think?  It'll happen.....no worries.
For the last several years, my oldest has read the story of Jesus' birth on Christmas Eve to the family.  I love hearing the word of God come out of my child's mouth.  I love that we are actively teaching our kids about the TRUE meaning of Christmas.  Kids are naturally selfish, and the commercialism and consumerism that surrounds us makes it that much harder to instill a concern for others in children.  I won't give up on trying, though!  My oldest (12) once told me that his eyes tear up when he does something nice for someone else. I told him it is a powerful feeling when you put someone else first, making them feel special.
The little ones are beginning to grasp the concept, as well.  The 4-year-old asked the 6-year-old last night why people put Christmas lights on their houses.  Instead of saying something like, "So Santa can find them," he calmly said, "To let everyone know that it's Jesus's birthday."  Score one for truth!
There are a few bittersweet aspects to this season, though.  My grandfather passed away on Christmas Eve many years ago.  I know my mom always misses him even more at this time.
This is our second Christmas without Mike's dad.  I'll tell that story in another post, another time.  We miss him terribly.
Mike's cousin, Josh, developed Acute Respiratory Distress Syndrome, and is now in intensive care in Houston.  He is sedated and on a ventilator.  He is only 24 years old, and I know his wife must be beside herself with worry.
Despite these things, we know that God is in control, and that we are all still very blessed.  I pray your Christmas will be full of family, laughter, fun, and remembrance of the amazing, undeserved gift God gave us in His son, Jesus! 
Merry Christmas to all!


Thursday, December 8, 2011

DIY Year-round Wreath tutorial


Hello, lovelies! Bloggy Slacker here! Good gracious, my poor little unloved blog! I reaaaalllly need to be better about posting regularly. For real this time. Really. For realzzzz.
Aaaaanyway, I have a great tutorial for you! I have recently fallen into the abyss that is Pinterest and have been SO inspired by all the wonderful ideas in one spot! I have been a crafty blog follower for a long time now, but Pinterest lets me collect all my favorite things from those blogs in one place! If you don't pin, you should pin. Just try it once.
All the cool kids are doing it.
I have never really decorated my porch with the seasons. I always have a plant (or empty flower pots waiting to be filled with plants) and some other junk randomly placed out there, but I have never really put in much effort. I decided this is the year of the porch!
I want to have a few pieces that can transition from season to season with just a few tweaks. I've never put a wreath on my door before, and have seen SO many delightful handmade wreaths on blogs and (of course) Pinterest.  Like this one, and this one.
There are TONS of yarn-wrapped wreath ideas out there.  It's a great idea because you have an infinite color palette, variety of textures, etc.  You can really customize this to fit your style!   I know Thanksgiving is sooooo two weeks ago, but I'm going to share my fall wreath, since that's the one I have pictures of. :oP
First thing, gather your materials.  For my wreath, I used a bare foam wreath purchased from JoAnn's, but you can also make your own (monster cheap) with plumber's foam tubing and some duct tape.  No lie.  You also need some fabric scraps, trims, anything you want to throw on there, and straight pins.
The coolest thing about this wreath is that everything is simply pinned on...therefore, REMOVABLE!  No need to make a bunch of different wreaths!  I chose a neutral grayish-brown yarn for mine, so it would match pretty much anything I decided to put on there.


Pick a spot and start wrapping your yarn tightly around your wreath form.  I wound my yarn ends a couple of times around a straight pin and pinned it to the wreath, so even the yarn isn't permanent!
The pins are on the back of the wreath, so no one will ever know!  Warning:  This part is time-consuming!  You need your strands to be close together.  I wrapped a few, then pushed them as close together as I could.  When you're done, you can start embellishing according to the season!  I chose to use rolled fabric rosettes, some ready-made trim, and ribbon.


You might need a few pins around the sides of the rosette to make sure it stays close to the wreath.  Just tuck the fabric over the top of the pin so it can't be seen.  Once you have all of your embellishments the way you want them, cut a strip of ribbon and pin it on either side of the top of your wreath, on the back side.  Like this:
You are ready to hang it up!  Here's my finished product hanging on my front door, with a "Happy Thanksgiving" magnet in the middle.
Yay!  As of this post, I have already taken everything off of it (except the yarn, DUH!) to re-dress it for Christmas!  Here's a peek at what it looks like so far:
I'll post a picture of the finished masterpiece soon!  If you try this yourself, I'd LOVE to see what you come up with! :o)